General
The BeagleBoneBlack has two internal CAN-Bus controller which are called DCAN0 and DCAN1. In this HowTo the DCAN1-interface will be used because the DCAN0 interface shares the IO-Pins with the I2C-Bus for the cape-identification. The pins of the DCAN1-interface are multiplexed to the connector P9 pin 24 (CAN_RX) & 26 (CAN_TX).
Electrical Interfacing to the CAN-Bus:
In the BeagleBone processor is only the CANBus-control logic integrated. So a driver circuit is needed for the physical connection to the bus. A simple driver circuit can be build around the SN65HVD231D from TI. This driver is working with +3.3V supply voltage and can be directly connected to the beagle bone pins.
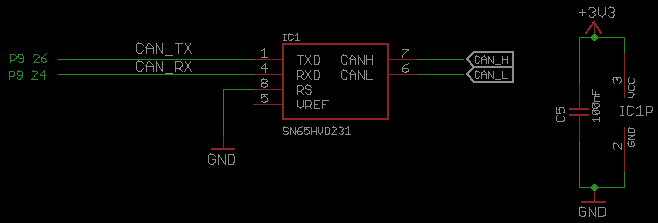
This simple can driver circuit is NOT isolated. That means that short circuit and overvoltage can destroy the driver circuit and the connected beagle bone!
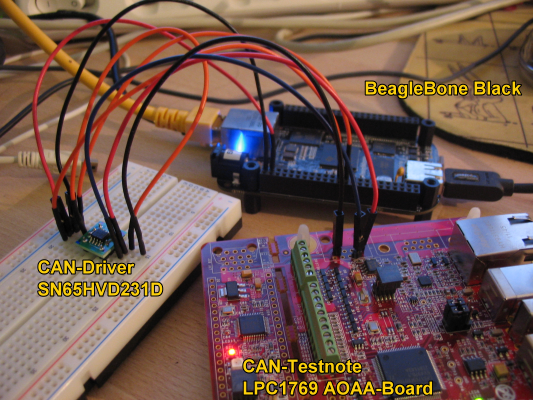
Below you can see a test setup with a SN65HVD231 CAN-driver and a LPC1769 AOAA-Board as a CAN-Node.
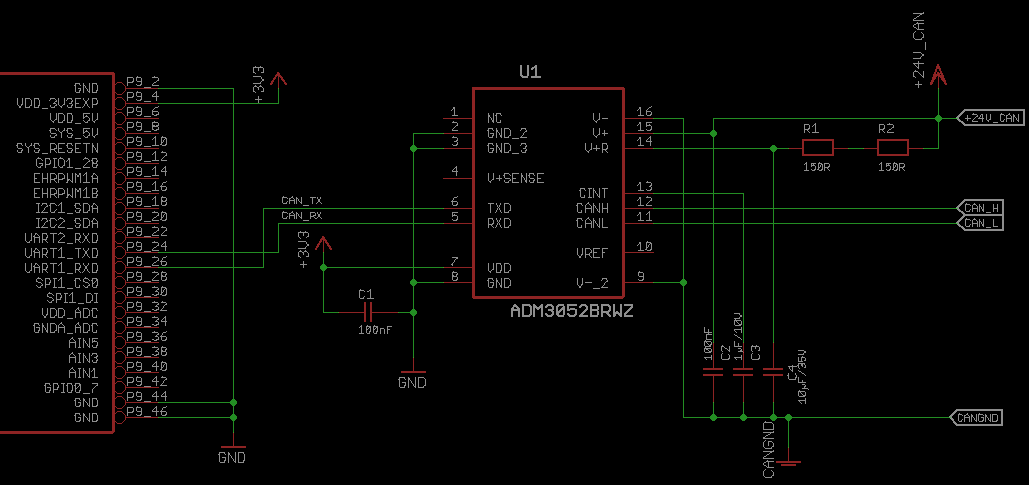
When you want to protect your beagle bone when your are doing experiments with the CAN-Bus you can use an isolated CANBus-driver for example the ADM3052BRWZ from Analog Devices. This driver needs two supply voltages: +3.3V for the beagle bone side and a +12 to +24V supply for the CANBus-side. The ground is not connected between the both supplies, so the beagle bone is isolated from the bus.
Enable the CAN Bus on the BeagleBone:
This description is based on the Debian 9.x Release. It contains already the kernel-driver for the CANBUS and the CAN-Tools collection. But it is important that the uboot-Bootloader of the beaglebone is also updated to the current version of the release. (How to update uboot.) When an old version of “uboot” is installed the “config-pin”-commands are not working.
To switch the IO-pins of the beaglebone to the can-mode it is just necessary to enter:
sudo config-pin p9.24 can
sudo config-pin p9.26 can
This pin configuration is only activ until the beaglebone is booted the next time.
Configuration of the IO-pins at boottime:
This can be done by a configuration script which is started by systemd at boottime.
The configuration script is generated with : sudo nano /usr/bin/config_pins.sh
In this script all necessary IO-pins can be added. For the canbus only the two pin of p9.24 & p9.26 are nedded so enter:
#!/bin/bash
config-pin p9.24 can
config-pin p9.26 can
Make the script executeable with: sudo chmod a+x /usr/bin/config_pins.sh
Setup of the service configuration: sudo nano /lib/systemd/system/config_pins.service and enter:
[Unit]
Description=Enable pin configuration at startup
After=generic-board-startup.service

[Service]
Type=simple
ExecStart=/usr/bin/config_pins.sh

[Install]
WantedBy=multi-user.target
To activate the new service:
sudo systemctl daemon-reload
sudo systemctl enable config_pins.service

sudo reboot
After the reboot the status check of the service will show this result:
sudo systemctl status config_pins.service

? config_pins.service - Enable pin configuration at startup`
Loaded: loaded (/lib/systemd/system/config_pins.service; enabled; vendor preset: enabled)
Active: inactive (dead) since Sun 2019-01-20 16:37:36 UTC; 39s ago
Process: 2040 ExecStart=/usr/bin/config_pins.sh (code=exited, status=0/SUCCESS)`
Main PID: 2040 (code=exited, status=0/SUCCESS)

Jan 20 16:37:36 beaglebone systemd[1]: Started Enable pin configuration at startup.
The configuration state of the pin p9.24 can be check with:
config-pin -q p9.24
-> P9_24 Mode: can
To bring up the interface CAN1 and configure the bus speed to 125kBit/sec enter the following lines:
sudo ip link set can1 up type can bitrate 125000
sudo ifconfig can1 up
To check that the can interface is up you can use ifconfig and should get this output:
root@beaglebone:~# ifconfig
can1 Link encap:UNSPEC HWaddr 00-00-00-00-00-00-00-00-00-00-00-00-00-00-00-00
      UP RUNNING NOARP MTU:16 Metric:1
      RX packets:0 errors:0 dropped:0 overruns:0 frame:0
      TX packets:0 errors:0 dropped:0 overruns:0 carrier:0
      RX bytes:0 (0.0 B) TX bytes:0 (0.0 B)
      Interrupt:191
To start the CAN interface at system startup the /etc/network/interfaces configuration file can be used by adding the following lines:
allow-hotplug can1
iface can1 can static
   bitrate 125000
First communication tests with the CAN Bus:
To test the communication over the CAN Bus you need to connect a second can device to your beagle bone and terminate the bus properly with 120 Ohm on both sides. For the first tests the CANSend and CanDump from the can-utils collection can be used. The can-utils are already installed in the debian 9.x image.
Sending a CAN-message to the adress 0x5a1 with the databyte[0..5]=0,1,2,3,4
./cansend can1 5A1#00.01.02.03.04
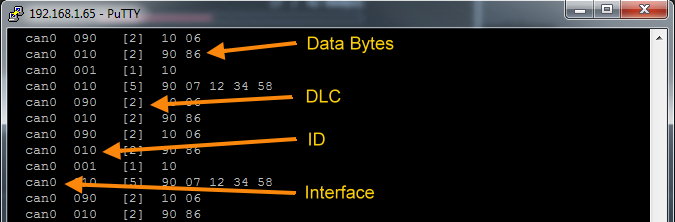
To log the messages on the CAN Bus you can use the CAN Dump program:
./candump can1
Communicate with Python over the CAN Bus:
From Python >3.3 the CAN Bus can be directly used via socketcan. For Python 2.7 the python-can-lib is used to communicate to the socketcan via the ctypes interface. The respository of the library can be found at https://github.com/hardbyte/python-can.
One easy way to install the Python canbus-Library is to use the pip installer:
sudo pip install python-can
In order to use this library a CAN interface needs to be specified by a configuration file or in the python program. For Python 2.7 the ‘socketcan_ctypes’ interface must be used. Here is an example how to send a messages with an extended id to the CAN bus:
sendcan.py:
|
|
Here is another simple example how to receive messages from the CAN Bus:
receivecan.py
|
|